Indesign document Setup
I’ve recently been introduced to the Adobe Software InDesign, which I was completely new to. These tutorials are vital for us to learn the software and understand how to use it even on a basic level; as we will be making our own book next week. I’ve noted down our first tutorial to help myself and others that want to learn/remember the steps needed to get to know InDesign thoroughly.
InDesign is a piece of software that brings everything together both image and text. For example the process that happens to create a magazine would include many steps, you’d have an illustrator, a designer, and many more than would cooperate in the process. It can even go as far as creating interactive books and interactive PDF’s that hypothetically you could download and use. Mainly, the software is used to create pages made for printing. Whether it’s considered an upside or a downside to the software, InDesign needs to operated in a very organized manner when it comes to working with images in other files, simply because when you place an image within the software, unlike that of Photoshop and Illustrator, it will remember the link from where that’s been opened from and would only print/show a blocky version of the image with large pixels. Working with the software, the rules are to just start with fresh files keeping them organized with the images you intend to use. If you move an image later on, things will get complicated which is why it’s important to be organized at the beginning. This is why it helps to always know a sketched out idea of what you want to produce before entering the software.
On to opening up InDesign:
Once InDesign is running, you’ll have to open up a new document. The box that will appear will most likely not include the extra options needed to set up a document properly. On the far right of the box you will have the button named ‘More options’ which you need to click on to be able to see the bleeding/slug options (one of the vital things to needed when working with InDesign for printing). The options available to you would need to be set up for the requirements of your client, but here is a brief overview of what each option is for;
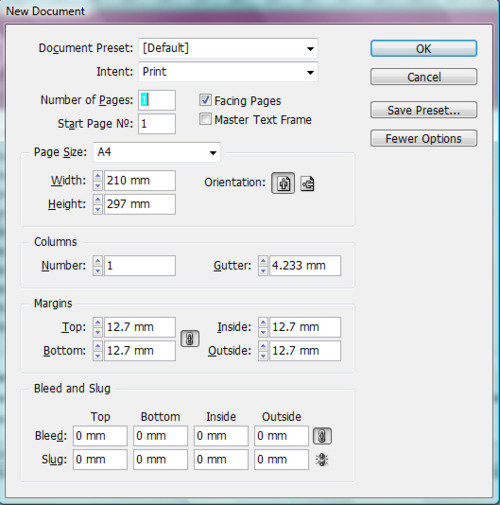
- Intent: This is the option where you select where you want it to go (web or print).
- Number of pages: Self explanatory, and down to what the client needs, but it’d easy enough to add pages later on, the same for start page.
- Facing pages: Is an option for something like a magazine, in which case that needs to be ticked, however if your designing a poster it would be un-ticked.
- Master text frame: This is something that is better to leave to add at a later time.
- Page Sizes: When working with sizing, for printing purposes to avoid wastage it’s easier to work with the ‘A’ sizes such as A4. This is purely because of paper sizing in particular will be created into these sizes, choosing to print in a different shape will be less economical with the wastage of paper.
- Columns: These set guides for the text columns. Unless you know what you want, leave the columns set as default because they are very easy to change later on once you have a better idea.
- Gutter: The space in-between the columns. 4.233 is default and sits well.
- Margins are the space around your page. Think of it as if when you hold a book, your thumbs cover the edges and not the content. A margin consistent round if fine if it’s a poster, however margin size will need to be altered for a book, as when it bends in the middle, with a fixed margin size you’d have some of the content folding in the bend. But also depends on how many pages the book has.
- The bleed – if you put a 3 mm bleed, is should compensate for any inaccuracy, but it depends on the printer as it varies, but the bleed is generally the whole way round.
- Slug in terms of printing, is for leaving notes for the printer
All these alterations to the page set up are only good with a decent printer!